On July 11, 2025, I started the Silverheels 100-mile trail run under a full moon at 4am in the...

Should you create a pacing chart for your next ultra?
Using a pacing chart is a personal preference and may not be necessary if you are running a familiar distance on familiar terrain. But if you are planning to move up in distance or run on a course unfamiliar to you, then a pacing chart can be extremely helpful. The biggest benefit to creating a pacing chart is that it forces you to study the course in detail and helps you create a realistic race plan. It also gives your crew a rough estimate on when you will be coming through each aid station. Here are some tips for creating a useful pacing chart. I have also included a link at the end to the pacing chart I created for my upcoming race, Silverheels 100-miler out of Como, Colorado.
- Find out how long the race ACTUALLY is. Ultras are notorious for being longer or shorter than the stated mileage (usually longer). Sometimes the race website will tell you the exact mileage, but it can also be helpful to find a Strava entry from a previous year so you can mentally prepare for a longer or shorter course. You need to factor any extra mileage into your pacing plan. Caltopo says that Silverheels 100 will actually be 106.5 miles, so I am mentally preparing for my watch to say 107 miles or longer. Seven extra miles during a 100-miler could equate to being on the course an extra two hours or longer!
- Find the average elevation gain for your event. To do this, take the total elevation gain for your event, divide by the number of miles, and multiply by two. So for Silverheels, I’ll take 19,310 ft of climbing and divide by 106.5 miles. Then I’ll multiply by two. This tells me that when I’m climbing, the average gain per mile is around 363 ft. In my training, I want to be hitting hills that range from around 200-500 ft per mile so that I’m training on similar grades as to what I will encounter in the race. Silverheels 100 has a similar amount of total descending, so I know to expect about the same range of feet per mile on the descents. You will be able to use your training on these grades to estimate how long each section of the course might take.
- Make a table or use a spreadsheet and start filling in the aid stations and distance between each aid station. Then try to determine how much climbing and descending each section will have. I did this using Caltopo, but you could also estimate this information using Strava. To find someone who has run the course on Strava, look at results from previous years and search the names until you find someone with a public account. You will need to use the aid station chart, elevation profile, and course map in order to estimate this for each section.
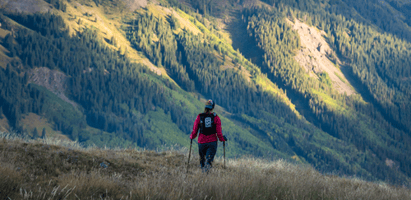
- Try to find photos or a course description of each section. You can look on AllTrails, use Google image search, or upload the course GPX file onto Strava. The photo above was automatically uploaded to my Strava route when I saved the GPX file of Silverheels 100 (ahh, it looks lovely, doesn't it?!). It’s important to know how much of the course might be smooth and runnable or rocky, technical, and slow. Just because a certain section looks like a nice, runnable downhill on paper does not mean reality will match that expectation! It may not be possible to know this information prior to race day, so just make sure to manage your expectations.
- Once you know what each section looks like on paper (and in photos, when possible), you can start filling in some guesses on what your pacing might look like. If you live and train on similar terrain as your course, you can use your own training to make some very educated guesses. Try to match some of your training runs to the similar climbs and descents found in each section. Look at your average elapsed pace and make your estimate based on that pace. For distances longer than 50K, I would take a conservative approach and estimate that each section will most likely be slower than your training runs, especially as the race progresses. You will be a different runner at mile ninety than you were at mile ten!
- Create various pacing scenarios such as an "A" pace, "B" pace, and "C" pace, and always include a scenario in your pacing chart where you are finishing shortly before cutoff. So much can happen over the course of an ultra that is unexpected or requires extra time to problem-solve. You need to be prepared mentally and physically to be out there for the duration of the event, and your pacer(s) and crew need to be in it for the long haul. If you create an expectation that you may finish just before the final cutoff, then everyone will be ecstatic to see you meet or exceed that expectation. But if you create an expectation that you will finish multiple hours before cutoff, then everyone may be slightly annoyed to have to keep pacing and crewing you much longer than expected.
- Include important notes regarding the course and your race plan. When is sunset and the earliest possible time you will need to be ready for darkness? How cold might it get at night and will you need to add layers? When will you pick up and drop off your pacer(s)? How much nutrition should you carry for each section? Which sections are the most difficult, steepest, or at the highest elevation? Which aid stations are your crew allowed to come see you? What do you want your crew to have ready for you? Having a pacing chart will help you think through these aspects of your race strategy (and more) in much more detail.
- Don’t ride or die by your pacing chart. In fact, so long as you are prepared with the proper gear and nutrition necessary for each section of the race, then you can forget about the specific times on the sheet. Those times are for your pacer(s) and crew to track you and keep you ahead of cutoffs. As a runner, just keep moving forward as efficiently as possible.
I am including a link to the pacing chart I created for my next race: Silverheels 100-mile. This is just an example of what a pacing chart might look like, and it’s still a work in progress! If you have any additional tips or questions about pacing charts, leave a comment below!
Follow Single Step Running on Facebook for more training tips!